This article explains how you can create an authorization or non-authorization or placeholder along with adding insurance details.
Once you have created a new patient, you would need to add an Authorization. All patients are required to have payor plans (i.e., authorization) in place for scheduling, receiving, and billing services. There are three authorization management options available that providers can assign to their patients. These options are explained in detail below:
1. Authorization: This refers to the authorization provided by the insurance for a specified date span, as well as the approved services and unit limits.
2. Non-Authorization: This option is suitable when the patient either doesn't require authorization or is a self-pay patient.
3. Placeholder: This option allows for temporary authorization to be used for scheduling and rendering services while waiting for the actual authorization. It's recommended for cases where a patient needs services, but formal authorization hasn't been received. Once received, providers can update the information, making previously rendered sessions eligible for billing.
Even when no authorization is required, it is still necessary to add one to schedule and provide services (referred to as the plan of care). Failure to add authorization for a patient will result in a 'without a plan of care' status, and it will appear in the client box on the dashboard.
1. Steps in Creating a New Authorization:
Navigate to the patient tab, select the desired patient, and click on 'Ins/Authorization'. If you already have an existing authorization for the selected patient, you'll find them on this screen.

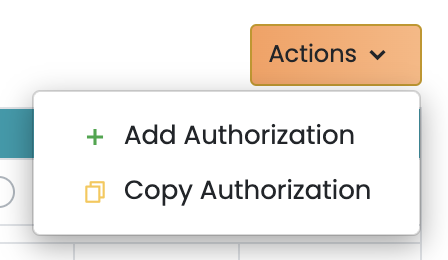
If you click on the plus icon, you will have two options:
- Add Authorization: To create a new authorization, click on 'Add Authorization' and follow the provided instructions.
- Copy Authorization: To renew an existing authorization, you can simply copy the old authorization, update the date range, and input the new authorization number.
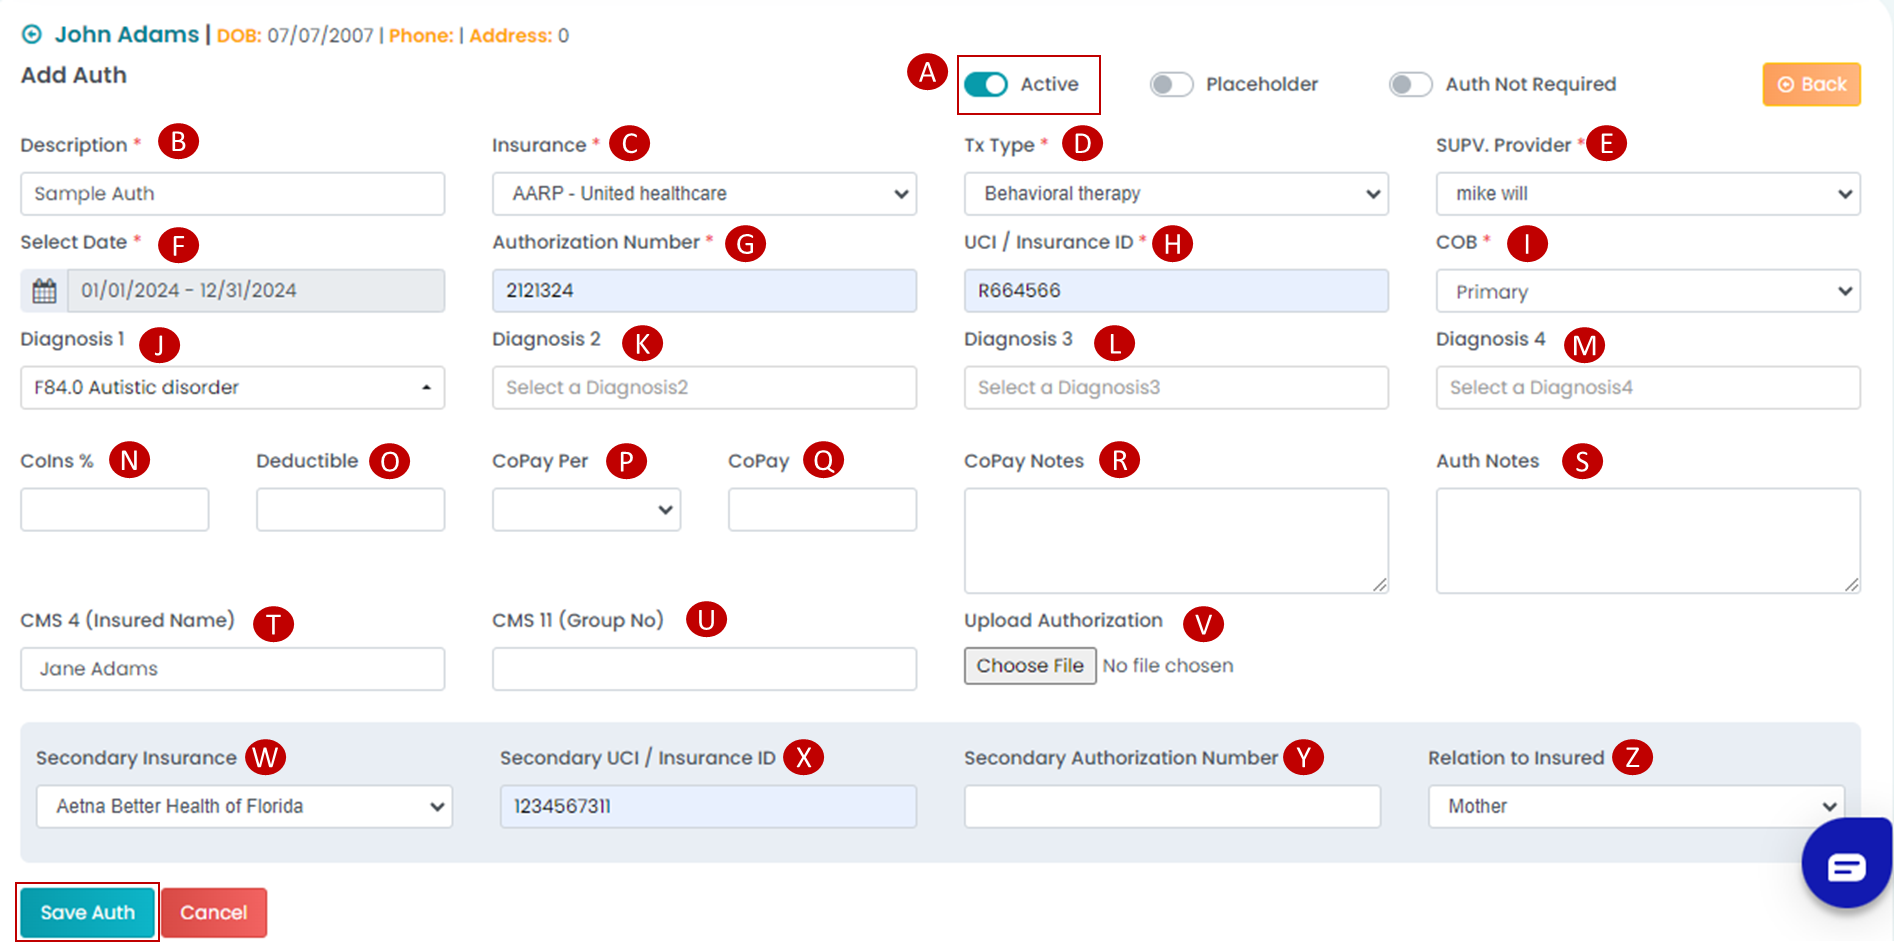
Add Authorization:
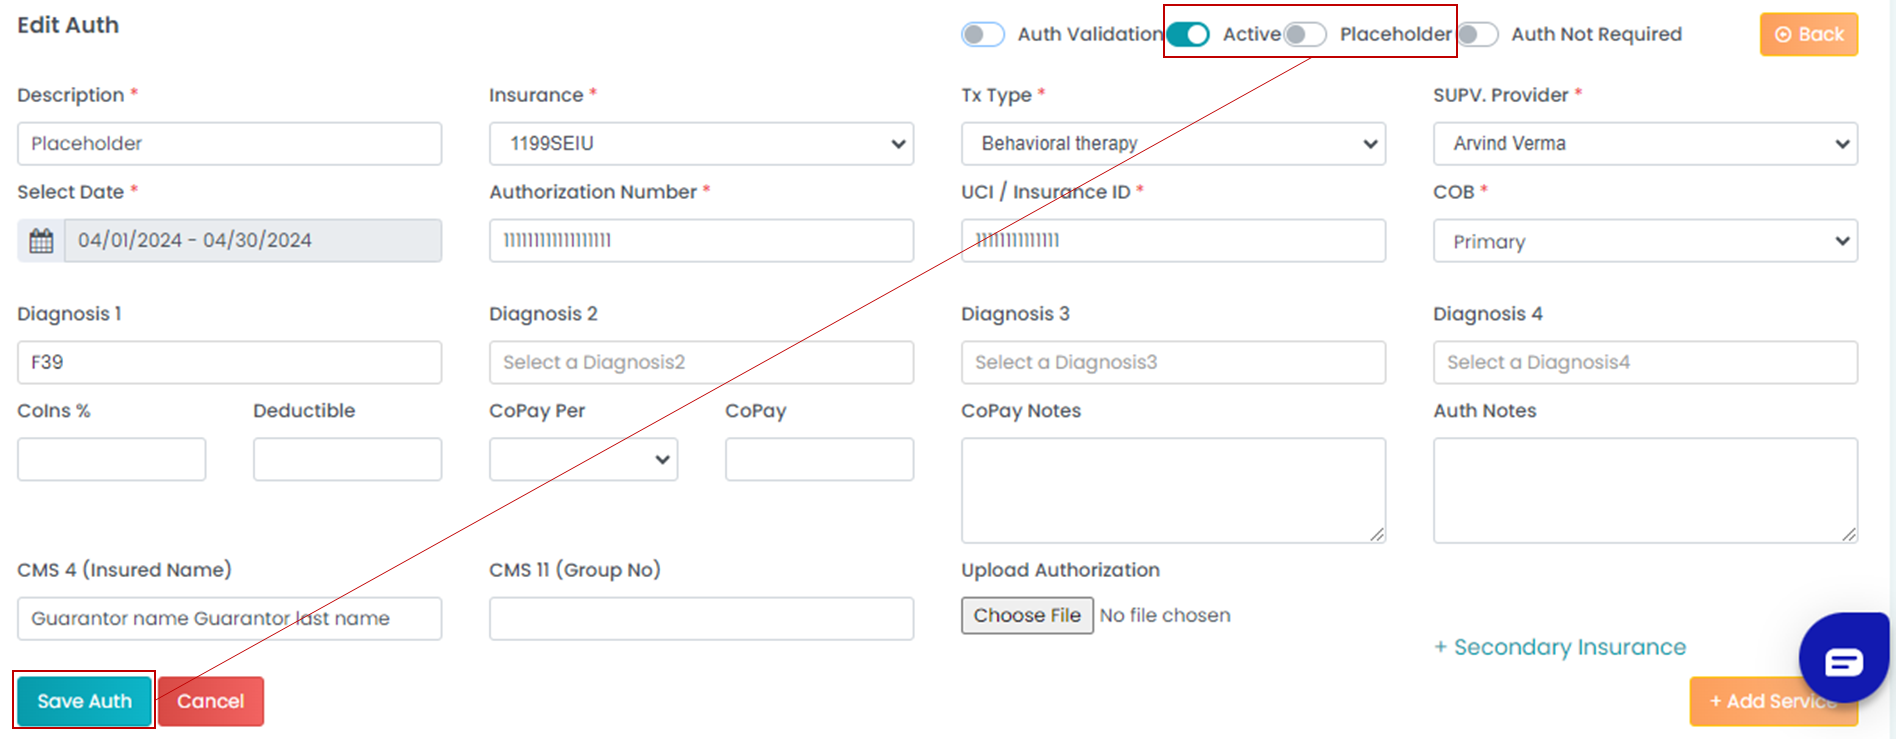
- Auth Status Toggle: You can choose between Active, Placeholder, and Auth Not Required. For active authorization, click on the Active toggle.
- Description: Enter a brief description. It is recommended to use the payor name as well as the date range, e.g. "BCBA Assessment 1.1.2021 to 03.01.2021"
- Insurance Tab: Select the payor from a list of insurance companies. This automatically populates from Add Insurance tab in Billing Setup.
- Tx Type: Select the treatment type. This option also automatically populates from the Add Treatment Type tab in Billing Setup.
- Supervising Provider: Select a provider from the designated list of supervising providers (if not listed, the provider needs to be marked as Supervisor from the Staffs edit area.)
- Date Selection: Select the date range from the pop-up calendar during which the authorization will be active.
- Authorization Number: Provide the authorization number. For non-authorizations, this field will have N/A.
- UCI/ Insurance ID: Enter the Insurance ID number.
- COB: Designate if insurance is primary, secondary, or tertiary.
- Diagnosis 1: Enter the diagnosis code 1. For ABA, it is typically F84.0 but you can enter up to four diagnosis codes.
- Diagnosis 2: Enter the second diagnosis code.
- Diagnosis 3: Enter the third diagnosis code.
- Diagnosis 4: Enter the fourth diagnosis code.
- Coins%: Add the co-insurance percentage.
- Deductible: Add the insurance deductible.
- Copay Per: Choose if CoPay is per session, day, or CPT code.
- Copay: Input the Copay amount for the authorization.
- Copay Notes: Enter the Copay notes.
- Auth Notes: Enter the notes related to the authorization.
- CMS 4 (Insured Name): Input CMS 4 details here. The system will fetch this from the Guarantor First Name and Last Name if it is added.
- CMS 11 (Group No): Inpur the CMS 11 details in this box.
- Upload Authorization: Upload the authorization hardcopy or any other auth-related files.
- Secondary Insurance: Input secondary insurance. Note: This can be populated only if you click on "+Secondary Insurance".
- Secondary UCI/Insurance ID: Enter Secondary Insurance ID
- Secondary Authorization Number: Enter the secondary auth number.
- Relation to Insured: Choose the relationship for the secondary insurance from the drop-down menu. Even for secondary insurance, the system will use the guarantor details provided in the patient demographics section.
Save Auth: After entering all the information click "Save Auth" to create the authorization.
Once you have created an authorization, you would need to create an authorization service.
2. Steps in Creating a Non-Authorization:
Click on the 'Patient' tab in the navigation bar, select the desired patient, and follow the instructions below.
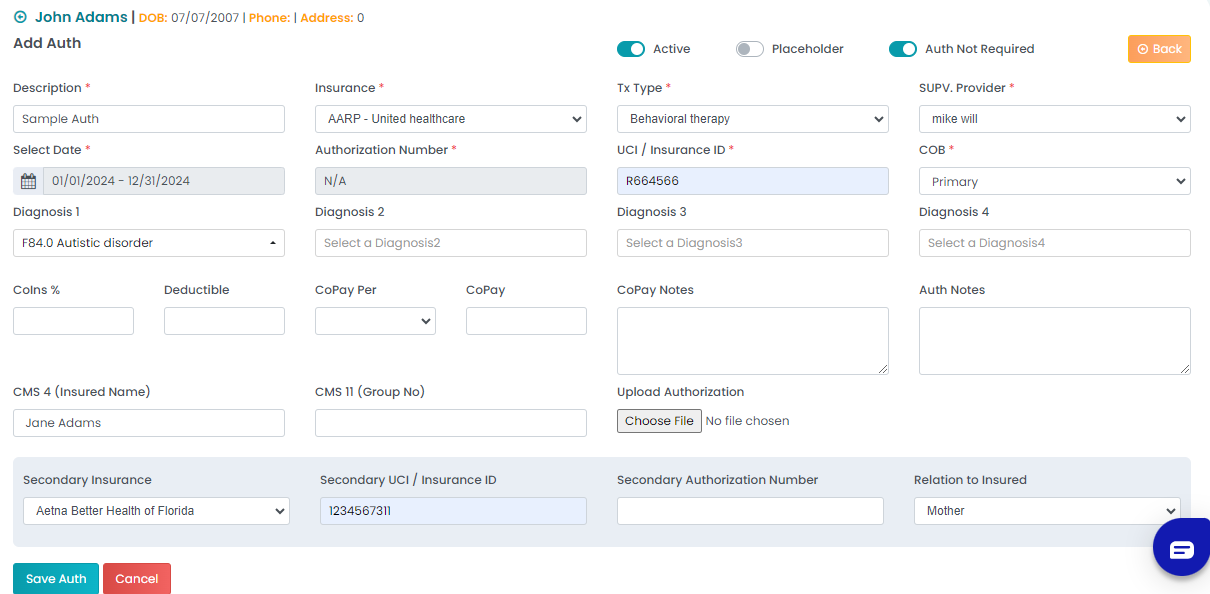
Activating the Non-Authorization Option: (Fig.1)
- Auth Status Toggle: Click on the Active and Auth Not Required toggle. When you select this option, some details will become grayed out and non-functional. You will need to fill out all the other required details.
- Follow the above steps for adding authorization from steps B to Z.
3. Steps in Creating a Placeholder:
A. Adding the PlaceHolder Option:
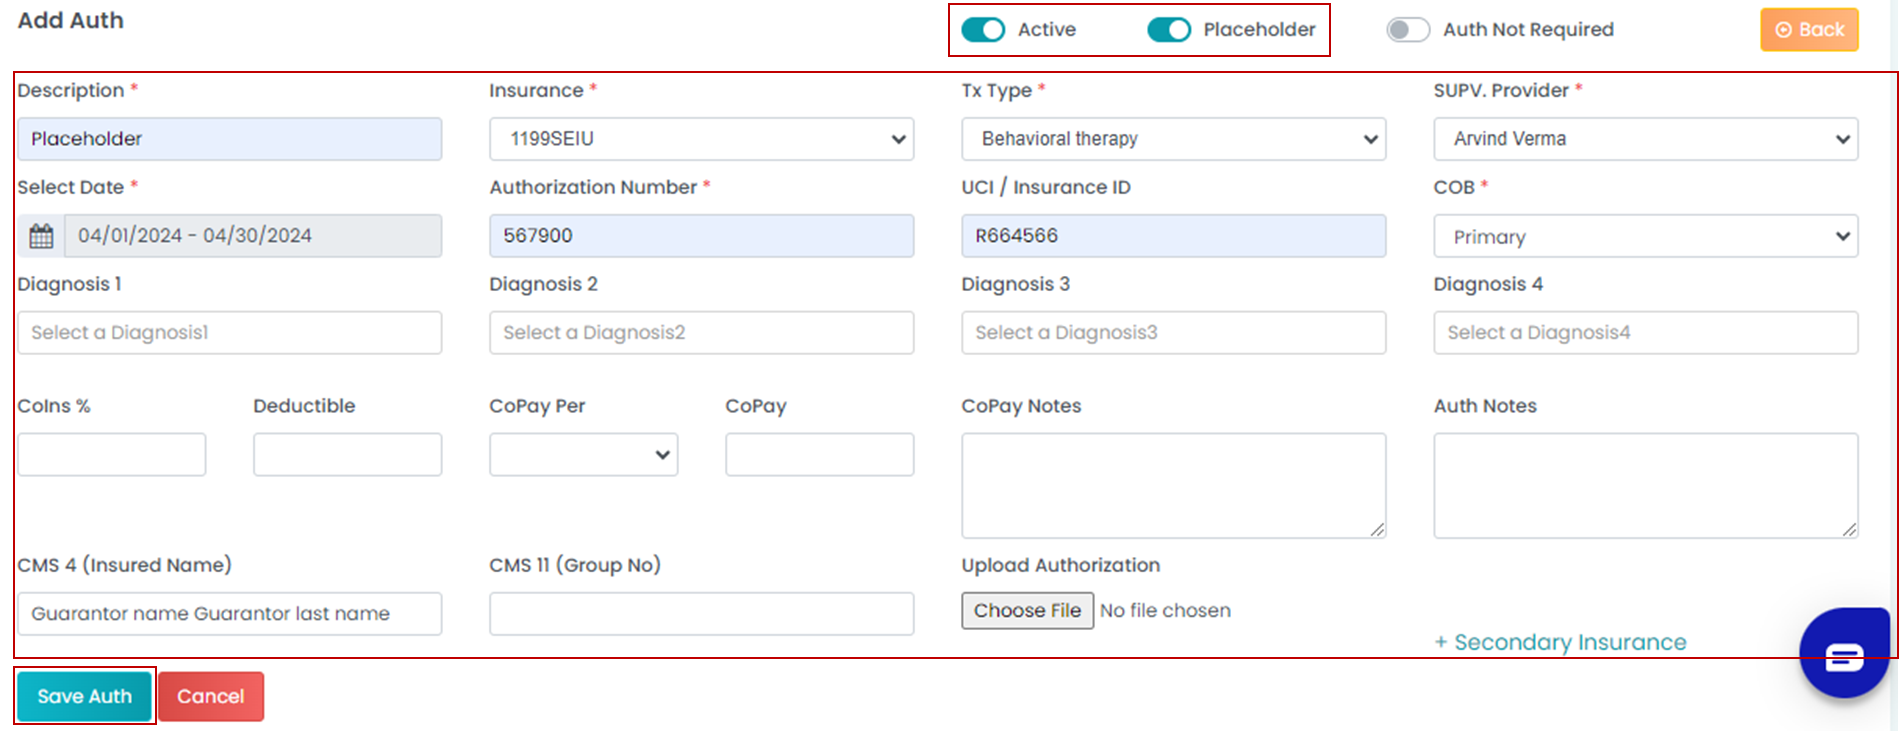
- Follow all the steps outlined in the "Steps in Creating Active Authorization".
- Click on the Placeholder toggle to indicate that there is a placeholder.
- Click on the "Save Auth" Button.
- Upon returning to the main "Ins/Authorization" page, you will notice a red dot and a capital "P" -
 indicating that the authorization is on a placeholder.
Make sure to select as "Active" even if you are using the "Placeholder" option while creating an authorization. If you fail to mark it as "Active" you would not be able to schedule any sessions with that authorization.
B. Removing the PlaceHolder Option:
Once the authorization process is complete and you have received all the required information, follow these steps:
- Return to this tab and click on the green pen and paper icon to edit the authorization.
- Toggle off the "Placeholder" option
- Click on the "Save Auth" button.
Once you have completed Step B, you will be able to effectively bill the sessions under the specific authorization.
1. Authorization: This refers to the authorization provided by the insurance for a specified date span, as well as the approved services and unit limits.
2. Non-Authorization: This option is suitable when the patient either doesn't require authorization or is a self-pay patient.
3. Placeholder: This option allows for temporary authorization to be used for scheduling and rendering services while waiting for the actual authorization. It's recommended for cases where a patient needs services, but formal authorization hasn't been received. Once received, providers can update the information, making previously rendered sessions eligible for billing.
Even when no authorization is required, it is still necessary to add one to schedule and provide services (referred to as the plan of care). Failure to add authorization for a patient will result in a 'without a plan of care' status, and it will appear in the client box on the dashboard.
1. Steps in Creating a New Authorization:
Navigate to the patient tab, select the desired patient, and click on 'Ins/Authorization'. If you already have an existing authorization for the selected patient, you'll find them on this screen.

If you click on the plus icon, you will have two options:
- Add Authorization: To create a new authorization, click on 'Add Authorization' and follow the provided instructions.
- Copy Authorization: To renew an existing authorization, you can simply copy the old authorization, update the date range, and input the new authorization number.

Add Authorization:
- Auth Status Toggle: You can choose between Active, Placeholder, and Auth Not Required. For active authorization, click on the Active toggle.
- Description: Enter a brief description. It is recommended to use the payor name as well as the date range, e.g. "BCBA Assessment 1.1.2021 to 03.01.2021"
- Insurance Tab: Select the payor from a list of insurance companies. This automatically populates from Add Insurance tab in Billing Setup.
- Tx Type: Select the treatment type. This option also automatically populates from the Add Treatment Type tab in Billing Setup.
- Supervising Provider: Select a provider from the designated list of supervising providers (if not listed, the provider needs to be marked as Supervisor from the Staffs edit area.)
- Date Selection: Select the date range from the pop-up calendar during which the authorization will be active.
- Authorization Number: Provide the authorization number. For non-authorizations, this field will have N/A.
- UCI/ Insurance ID: Enter the Insurance ID number.
- COB: Designate if insurance is primary, secondary, or tertiary.
- Diagnosis 1: Enter the diagnosis code 1. For ABA, it is typically F84.0 but you can enter up to four diagnosis codes.
- Diagnosis 2: Enter the second diagnosis code.
- Diagnosis 3: Enter the third diagnosis code.
- Diagnosis 4: Enter the fourth diagnosis code.
- Coins%: Add the co-insurance percentage.
- Deductible: Add the insurance deductible.
- Copay Per: Choose if CoPay is per session, day, or CPT code.
- Copay: Input the Copay amount for the authorization.
- Copay Notes: Enter the Copay notes.
- Auth Notes: Enter the notes related to the authorization.
- CMS 4 (Insured Name): Input CMS 4 details here. The system will fetch this from the Guarantor First Name and Last Name if it is added.
- CMS 11 (Group No): Inpur the CMS 11 details in this box.
- Upload Authorization: Upload the authorization hardcopy or any other auth-related files.
- Secondary Insurance: Input secondary insurance. Note: This can be populated only if you click on "+Secondary Insurance".
- Secondary UCI/Insurance ID: Enter Secondary Insurance ID
- Secondary Authorization Number: Enter the secondary auth number.
- Relation to Insured: Choose the relationship for the secondary insurance from the drop-down menu. Even for secondary insurance, the system will use the guarantor details provided in the patient demographics section.
Save Auth: After entering all the information click "Save Auth" to create the authorization.

Once you have created an authorization, you would need to create an authorization service.
2. Steps in Creating a Non-Authorization:
Click on the 'Patient' tab in the navigation bar, select the desired patient, and follow the instructions below.
Activating the Non-Authorization Option: (Fig.1)
- Auth Status Toggle: Click on the Active and Auth Not Required toggle. When you select this option, some details will become grayed out and non-functional. You will need to fill out all the other required details.
- Follow the above steps for adding authorization from steps B to Z.

3. Steps in Creating a Placeholder:
A. Adding the PlaceHolder Option:
- Follow all the steps outlined in the "Steps in Creating Active Authorization".
- Click on the Placeholder toggle to indicate that there is a placeholder.
- Click on the "Save Auth" Button.
- Upon returning to the main "Ins/Authorization" page, you will notice a red dot and a capital "P" -
 indicating that the authorization is on a placeholder.
Make sure to select as "Active" even if you are using the "Placeholder" option while creating an authorization. If you fail to mark it as "Active" you would not be able to schedule any sessions with that authorization.

B. Removing the PlaceHolder Option:
Once the authorization process is complete and you have received all the required information, follow these steps:
- Return to this tab and click on the green pen and paper icon to edit the authorization.
- Toggle off the "Placeholder" option
- Click on the "Save Auth" button.
Once you have completed Step B, you will be able to effectively bill the sessions under the specific authorization.

