This article explains how you can create a staff and edit their info. Video Walkthrough
For a live demonstration on Adding New Staff, watch the below video:
How To Create A Staff?
Step 1: Access the Staff tab to create a Staff / Provider

Click "Add Staff / Provider" in the top right in the "Staff" module to create a provider or a staff or an admin in the facility. to get started.
Step 2: Enter the provider/ staff information
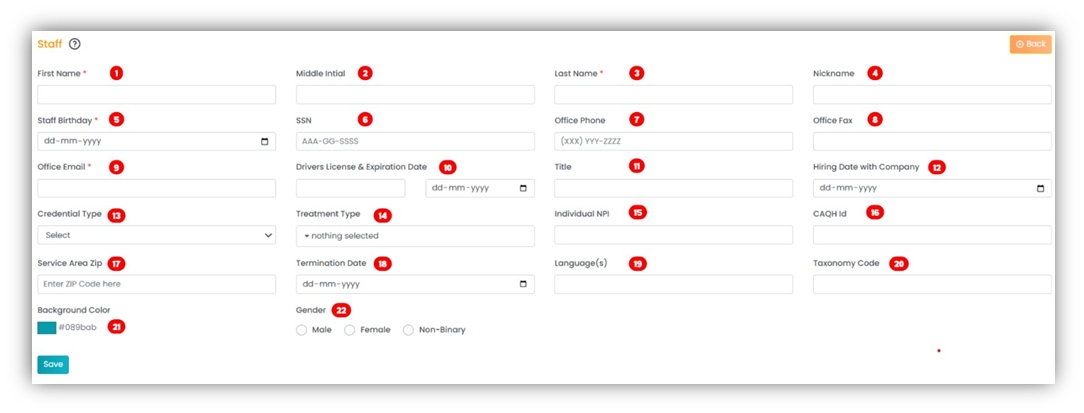
- First Name – Enter the first name of the staff/ provider. This is a required field.
- Middle Initial – Enter the middle initial.
- Last Name – Enter the last name of the staff/ provider. This is a required field.
- Nickname – Enter the nickname.
- Staff Birthday - Birthday of staff, entered in mm/dd/yyyy format. This is a required field.
- SSN - Social Security Number of staff/ provider. This is a required field.
- Office Phone - Best phone number staff/ provider can be reached. This is a required field.
- Office Fax - Fax number of staff (if applicable)
- Office Email - Business e-mail of staff member. This is a required field.
- Driver's License & Expiration Date - The license number can be added to the empty box to the left--State ID number can also be used if they do not have a Driver's License. Expiration date in the date field to the right, in mm/dd/yyyy format.
- Title - Staff title with the company
- Hiring Date with Company - Date of first employment, in mm/dd/yyyy format
- Credential Type - Select from a dropdown of available Staff Types (configured from facility setup).
- Treatment Type - to be updated
- Individual NPI - Add provider's NPI for billing
- CAQH ID - Add the provider's CAQH ID for billing
- Service Area Zip - Zip code from which proximity to the patient can be calculated
- Termination Date - If disabled, the date on which the staff member was removed from the clinic/practice
- Language(s) - Proficient languages of individual
- Taxonomy Code - Provider's Taxonomy code used for billing
- Background Color - Sets the default color of appointments for the provider in the calendar view.
- Gender - Male or Female
Manage staff portal & access settings.
Manage Access settings:
- Navigate to the Staff module.
- Select the desired staff member using the scroll list or search bar.
- Go to Staff Portal > Access Settings (second tab).

- Toggle the permissions you wish to allow or deny for the selected provider.
- Changes will be applied automatically in the provider’s portal based on their assigned roles and responsibilities.
Staff portal initiation:
- Navigate to the Staff module.
- Select the desired staff member using the scroll list or search bar.
- Go to Staff Portal.

4. Share the portal link with your staff via email by clicking on the "Send Invitation" button. The email addresses that you provided during staff creation will automatically appear. You can see the status of their account setup on the screen

5. Alternatively, you can provide them with a link to change their password. Access the staff profile in the admin account and locate the "Staff Portal" tab. Choose an expiration date for the link and click on "Generate Link." You can then share it with them by
copying it and sending it in a message/email or sending it directly to their email. They can reset their password by clicking on the link, and they will then be able to log in.