The article explains on how to process payroll and route it for submission process.Video Walkthrough
For a live demonstration on Payroll Processing Tab, watch the below video:
This is the 1st step in processing staff/provider payroll.

- Navigate to Payroll > Processing Payroll.
- Click the Processing Payroll (Step-1) category to start the process.
- Depend on what the user selects in the Filter By option -
- For Pay Period, choose the payroll submission period from the list.
- For Date Range, select the date range.
- Select the staff members from the list to process payroll, then click the View button. This step applies to both selecting a pay period or a date range.
- After clicking the view button, the data table will be generated with the following information:
- Time & Date - Service Time and Date.
- Provider - The Service provider.
- Patient - The patient that attended the session.
- Service Location - Location of the service (POS).
- Service - The Description of the service that occurred.
- Tx Hrs - The number of hours of the service session.
- Submission Hrs - The hours that has been mentioned while submitting timesheet.
- Hrs. Accepted - This field can be edited by adding in desired hours from calendar.
- Extra Amount - Any extra amount added while submitting timesheet will display in this column.
- Total Amount - The total amount of payroll set up will display here.
- Mileage - The mileage travelled that has been entered will display in this column.
- Mileage Approved - This field can be edited by adding in desired mileage.
- Grand Total. - The gross amount to be paid.
Drop-Down Options
Use the checkbox to select the line items and access the drop-down on the bottom left corner of the list;
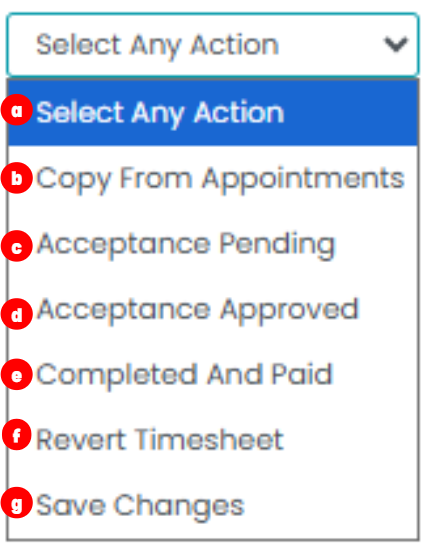
- Copy from Appointments - This option will copy hours from appointments.
- Acceptance Pending option - When this option is selected the timesheets reminds in the first step and wont be moved.
- Acceptance approved option - This option will move the timesheet to the second step.
- Completed and Paid - This option will move all the timesheet directly to third step.
- Revert timesheet - Will move back all the submitted timesheet.
- Save Changes - Any changes made here can be changes using this drop down.
Use the above-mentioned options as needed to make the desired updates.