Processing claims
Step 1: Access Primary Billing Manager

1. From the left navigation menu, go to Billing.
2. Select Primary Billing Manager.
This page is where you manage your primary billing workflow.
Step 2: Configure Billing Rules

1. Click on the Gear icon in the top-right corner.
2. This opens Billing Rules.

3. Toggle ON the splitting rules you want the system to follow.
4. Toggle OFF any rules you do not want applied.
Step 3: Generate Appointments for Billing

1. Select the date: Up to which you want to generate appointments. The system will pull all appointments up to the selected date.
2. Click Generate.

2. Select Payer Type: Self-Pay: Includes all patient-pay invoices, Professional: Includes insurance claims.

3. Select Claim Status Ready to Bill, No Show: Includes invoices for patients who did not attend

- Select Payer: Select the payer from the dropdown.
- Click Go to generate claims based on your selections.
Step 5: Review Claims:
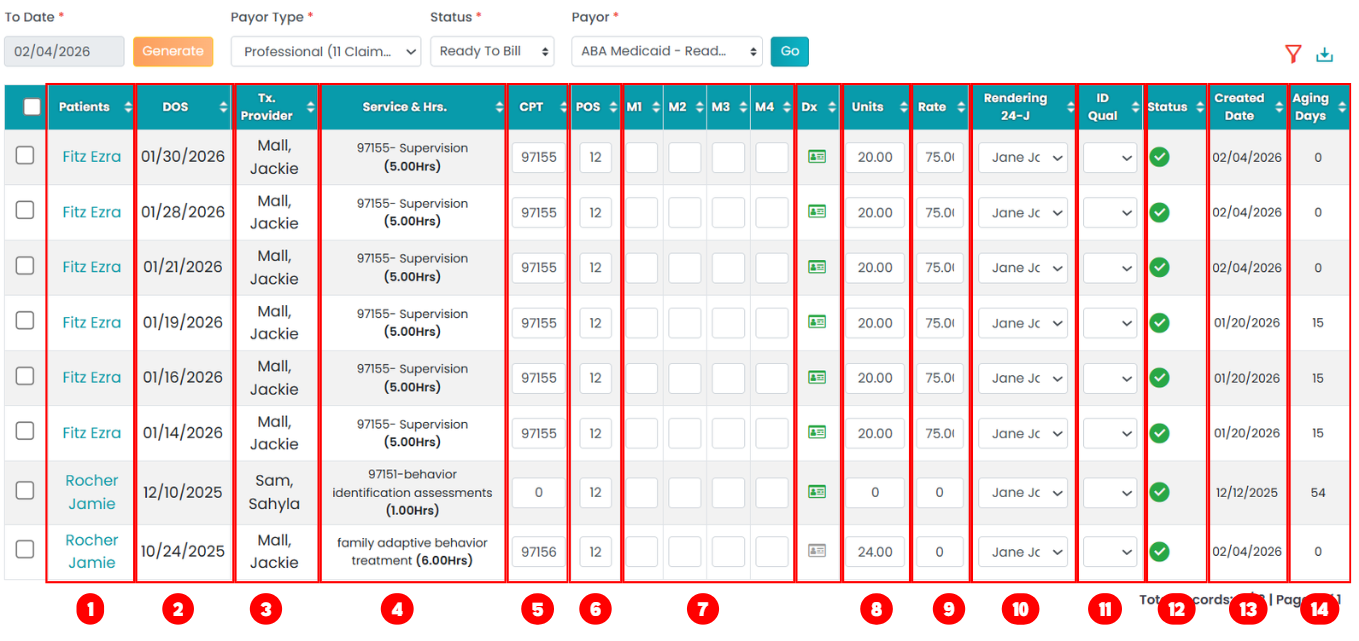
Claims are displayed in a table with the following details:
- Patient Name - Name of the patient
- Date of Service - Appointment service date
- Tx Provider - Provider who delivered the service
- Service & Hours - Service type and duration
- CPT Code - Procedure code
- Place of Service(POS) - Location type of service
- Modifiers - Service Modifiers (if applicable)
- Diagnosis Code - Green card indicates DX code is available. Click the card icon to manage.
- Units - Will display total units calculated for service hours
- Rate - Will display contract rate that is in insurance contract rate
- Rendering Provider - Can be changed from the supervisor list
- ID Qualifier - Editable provider identifier
- Status - Red = Pending, Green = Ready to Bill
- Created Date - Claim processed Date
- Aging Date - Displays how many days from processed
Steps 6: Bulk Editing Claims:
You can select multiple claims and use the multiple edit options mentioned below.
Change Stratus:
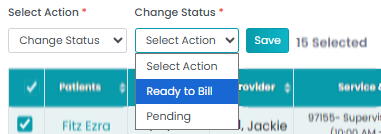
Pending – Changes the claim status to pending for further review or processing.
Ready to Bill - Removes the claims from pending and moves to ready to bill status.
Bulk Update:
You will be able to update multiple claims in bulk as outlined below.
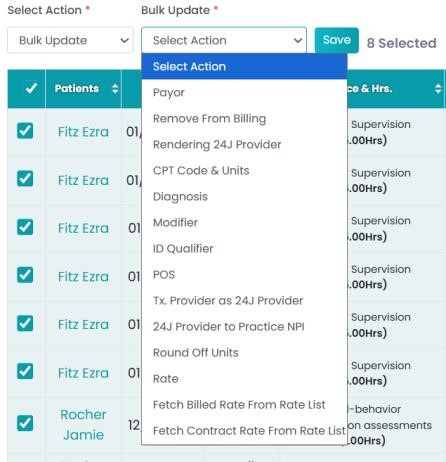
- Payer
- Remove from Billing
- Rendering Provider
- CPT Code
- Diagnosis Codes
- Modifiers
- ID Qualifier
- Place of Service (POS)
- Treatment Provider to Rendering Provider
- 24J Provider to Practice NPI
- Round Off Units
- Update Rate
- Fetch Billed Rate (from insurance rate list)
- Fetch Contract Rate (from insurance rate list)
Retract:
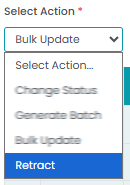
Use Retract to remove multiple claims at once.
Steps 7: Batching Claims:

Generate Batch: You can batch claims together after selecting them.
- Creates a batch
- Assigns a batch number
- Moves claims to Manage Billing