Video Walkthrough
View the below walkthrough video to learn more about Patient Statement
Manage Patient Statements
Step 1: Processing invoices
1. After the session is completed, begin by processing the billing.
2. Navigate to the Primary Billing Manager page.
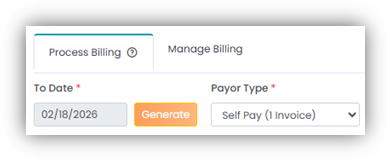
3. Under the Process Billing tab, apply the To Date to generate the billing list. In the Payor Type field, select Self-Pay Invoice.
4. Apply the filter, and the list will populate accordingly.
5. Review the entries and make any necessary changes within the Process Billing tab.
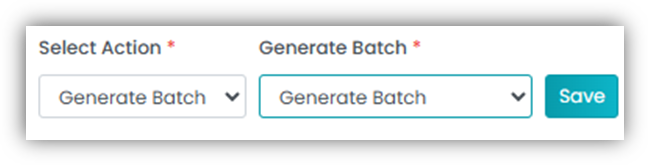
6. Once everything is verified, bulk generate the batch.
7. After the batch is created, move to the Manage Billing tab.
8. In the Manage Billing tab, you will be able to view the invoice that has been generated. Click on the invoice number to view and review.
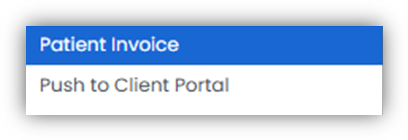
9. To bulk view invoices bulk select the invoices and access the Patient Invoice option.

10. To bulk push all invoices to the client portal, select the Push to Client Portal option. Once selected, the client will receive an email notification and will be able to access the invoice directly from their portal.
Step 2: Manage Statement
1. Click Manage Statements from the left-hand menu.
2. Sort by Invoice, Patient, Date Range, or Date of Submission. After applying a sort option, select the data that corresponds to the chosen filter.
3. The data will appear based on the selected filters. The columns listed below provide detailed information about each invoice.

- Invoice: This column displays the generated invoice number. Click on the invoice number to open and review the invoice details.
- Patient: This column will display the patient’s name of the invoice.
- Date Range: It will display the from and to date range for all line items included in the invoice.
- Invoice Date: Will display the day of the invoice generation.
- Due Date: The invoice due date will be displayed here. You can edit and set your preferred due date, and the updated date will automatically reflect on the invoice.
- Total: This column will display the total amount of the invoice.
- Extra: This column displays any additional amount added to the invoice, such as a late fee or other applicable charges.
- Paid: This column will display any amount that is paid in this particular invoice.
- Grand Total: This column shows the grand total due after applying any additional charges and subtracting any payments made from the total invoice amount.
- Action: Action button contains of all the options to manage the invoice.
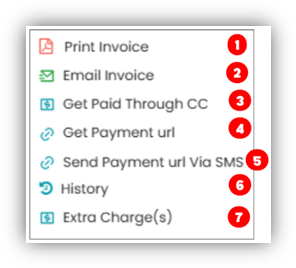
- Print Invoice: You will be able to view the invoice.
- Email Invoice: If you select this option, you will be directed to the email drafting page, where you can customize and send the invoice via email.
- Get paid Through CC: If you select this option, you will be directed to the Credit Card Payment page. This option will only be visible if the client has credit card on file.
- Get Payment URL: This option copies the payment link URL to your clipboard, which you can then share with the client to collect payment.
- Send Payment URL via SMS: This option allows you to send the payment link directly to the client’s phone number saved in their profile.
- History: This option provides a detailed history of the invoice emails that have been sent.
- Extra Charge(s): This option allows you to add any additional amount to the invoice. Once added, the extra charge will be automatically included in the total invoice amount.

4. Bulk Action: In the top-right corner, you can access the Action button, which allows you to manage all the actions listed below.
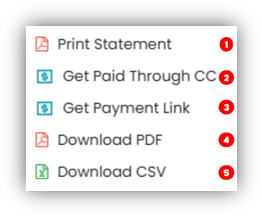
- Print Statement: Will provide bulk print of all the invoices selected.
- Get Paid Through CC: Will let direct you to the payment page for all the invoices selected.
- Get Payment Link: This option copies the payment link URL to your clipboard for all the invoices selected.
- Download PDF: Will provide an export for all the invoices in a PDF format.
- Download CSV: Will provide and export for all the invoices details in a CSV format
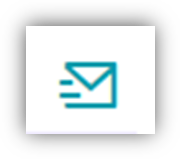
5. Manage Email Template: In the top-right corner, select the Email icon to open the Email Templates page. From here, you can customize your own email templates for sending invoices to clients. Click Add New Template, apply your customizations, and save the template for future use.
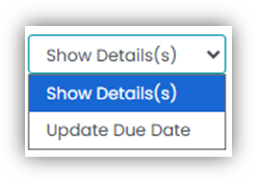
6. Dropdown: You will be able to bulk select the invoices and use the dropdown below to Show details and to bulk update the Due date.