Video Walkthrough
View the walkthrough video below on Box 33 & 34 in Facility Setup
This articles explains the information that needs to be added to the Box No. 33 & 32 field.
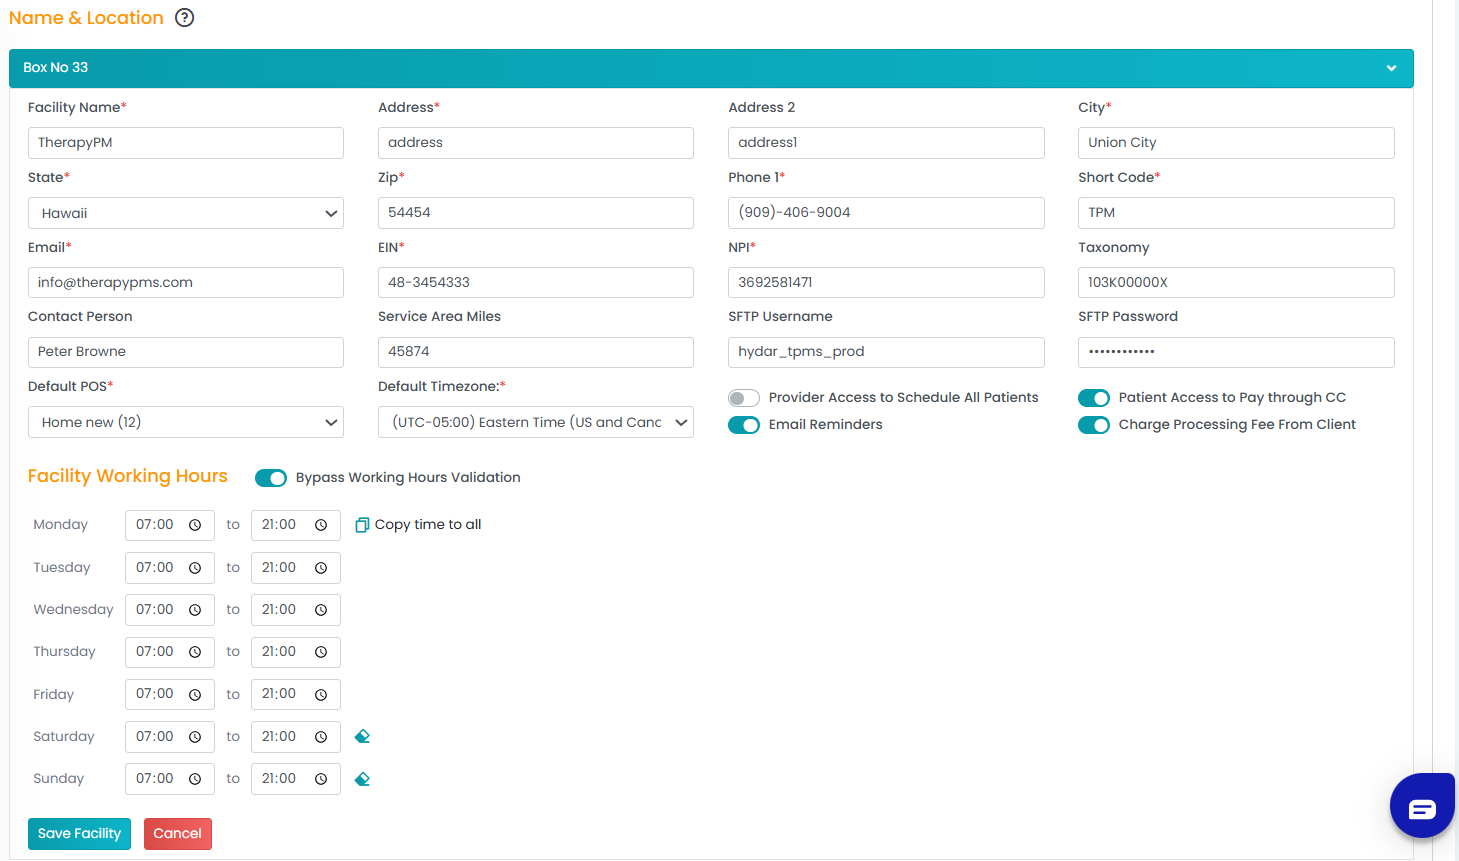
In the Name & Location tab, you need to add basic information about the facility. This information will appear in the Box No. 33 & 32 fields on HCFA forms and set up system rules.
Box No. 33:
Go to Settings > Facility Setup > Name & Location.
A. Facility Set-up:

Under Box No. 33, enter the following details:
- Facility Name: Enter your clinic's name.
- Address: Add the main office address.
- Address 2: Add any additional address details (if applicable).
- City: Enter the city of the main office.
- State: Enter the state of the main office.
- Zip: Enter the 9-digit Zip/Postal code of the main office.
- Phone 1: Enter the clinic's phone number.
- Short Code: Enter the abbreviated version of the clinic's name.
Note: Short code needs to be added correctly for automatic claims posting. - Email: Input the email address of the main administrator.
- EIN: Input the clinic's tax ID.
- NPI: Input the clinic's group NPI.
- Taxonomy: Input the clinic's taxonomy code.
- Contact Person: Enter the name of the main administrator or owner.
- Service Area Miles: Specify the proximity in which the clinic can physically see clients at their homes.
- SFTP Username: Add the clearinghouse SFTP username (required for non-integrated clearinghouses like Office Ally for electronic EDI/HCFA transmission).
- SFTP Password: Add the clearinghouse SFTP password (required for non-integrated clearinghouses like Office Ally for electronic EDI/HCFA transmission).
- Default POS: Select a default Place of Service from the drop-down menu.
Note: All the appointments will be default to this selection, but you can edit it. - Default Timezone: Choose the relevant Timezone.
B. Facility Set-up Access:
- Provider Access to Schedule All Patients: Toggle this switch to grant providers access to schedule sessions with all patients.
Note: Only if this toggle is switched on, staff will have access to schedule all patients, provided you have enabled the relevant access in Staff Bios. - Email Reminders: Enable this toggle to receive email reminders for the facility.
- Patient Access to Pay through CC: Enable this toggle to allow clients to pay their invoices through their portal.
- Charge Processing Fee from Client: Enabling this option allows you to pass transaction processing fees directly to clients.
C. Facility Working Hours:
To set your facility's operating hours in TherapyPM, please follow these steps:
- Navigate to the Settings module on the left side of your screen.
- Click on Name & Location.
- In the Facility Working Hours section, update your clinic's start and end times for each day.
- If you need to schedule a session outside these standard working hours, toggle the Bypass Working Hours Validation switch to ON.
- Finally, click on the Save Facility icon to apply the changes!

Box No. 32:

Under Box No. 32, enter the following details:
- Region Name: Enter the name of the region.
- Facility Name: Enter your clinic's name.
- Address: Add the address of the clinic situated in this region.
- City: Enter the city where this clinic is located.
- State: Choose the state where this clinic is situated.
- Zip: Enter the 9-digit Zip/Postal code of this clinic.
- Phone 1: Enter the phone number of this clinic.
- NPI: Input the group NPI specific to this clinic in the region.
Other details:
- If the details for the specific region are the same as those in Box No. 33, click on the orange 'Copy from Box No. 33' tab in the top right corner.

- If you have multiple locations, click the plus icon next to the primary region field and enter the details for each clinic located in that specific region. (Follow the same steps as the previous point.)

- If you want to delete any region, click on the red trash icon.

Note: You will not be able to delete a specific region if the providers and clients are assigned to that region.
Once all the details are added, click the "Save Facility" icon.
